var 타입의 number 변수를 두어numbertextView의 text 에 number 값 대입한다.
number 변수의 값을 변경한 후
textview 의 text 는 String 타입이고number.toString() 으로 형 변환하여 넣기
number 는 Int 타입이므로
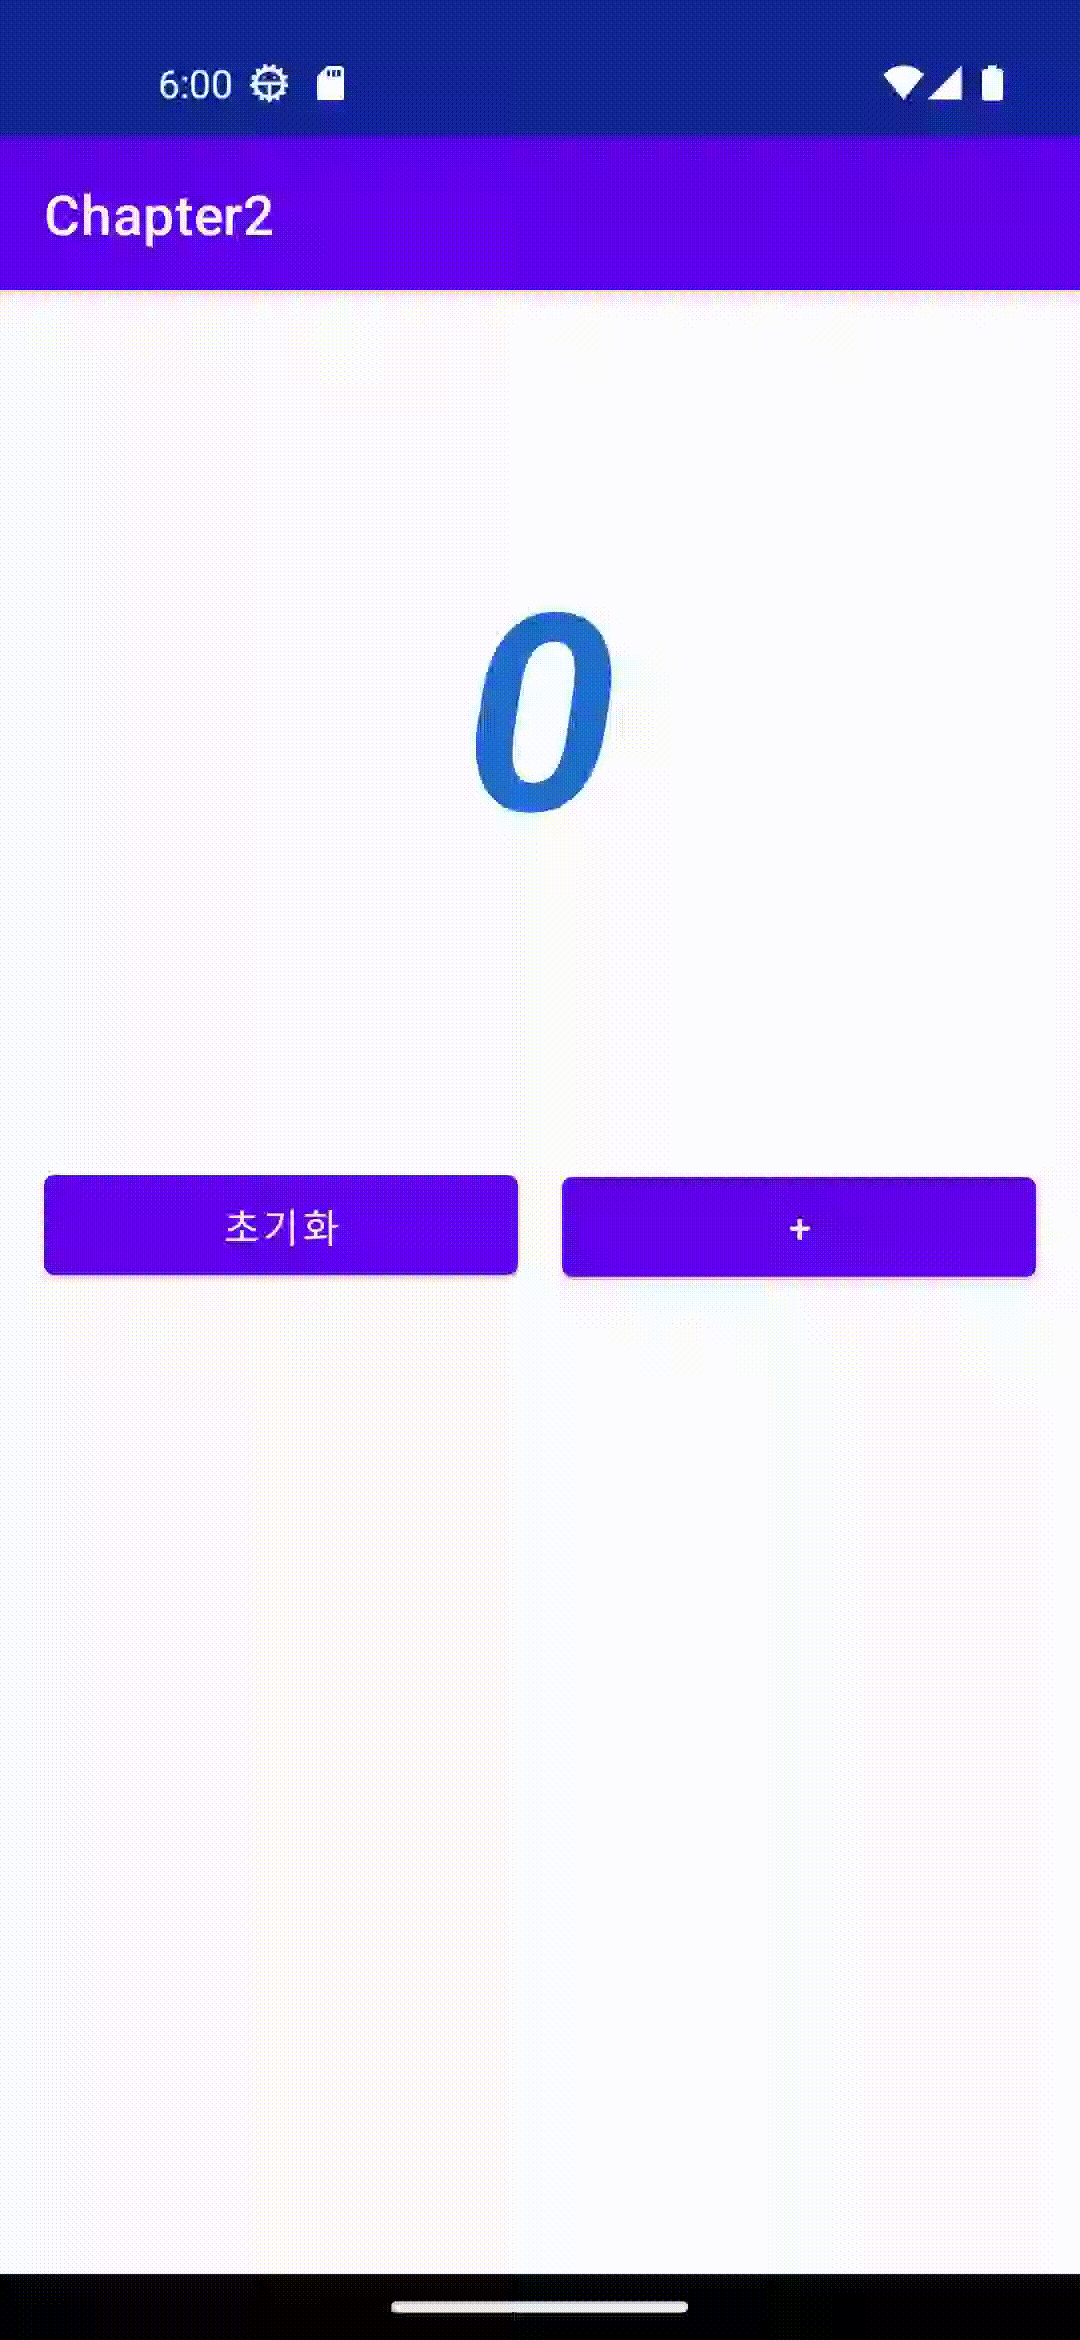
var number = 0

// 동작에 대한 연산 처리
// 클릭에 대한 처리
resetButton.setOnClickListener{
    number = 0
    numberTextView.text = number.toString() // 숫자를 문자열로
}
2) 결과
3) 전체코드
Activity.kt
package com.part1.chapter2

import androidx.appcompat.app.AppCompatActivity
import android.os.Bundle
import android.util.Log
import android.widget.Button
import android.widget.TextView

class MainActivity : AppCompatActivity() {
    override fun onCreate(savedInstanceState: Bundle?) {
        super.onCreate(savedInstanceState)
        setContentView(R.layout.activity_main)

        // UI 요소 가져오기
        val numberTextView = findViewById<TextView>(R.id.numberTextView)
        val resetButton = findViewById<Button>(R.id.resetButton)
        val plusButton = findViewById<Button>(R.id.plusButton)

        var number = 0

        // 동작에 대한 연산 처리
        // 클릭에 대한 처리
        resetButton.setOnClickListener{
            number = 0
            numberTextView.text = number.toString() // 숫자를 문자열로
            // 리셋 버튼의 클릭에 대한 리스닝을 하고 있는지 확인하기 위해 Log 찍기
            Log.d("onClick", "리셋된 숫자는 $number") // 디버깅용이므로 Log.d
        }

        plusButton.setOnClickListener{
            // + 버튼의 클릭에 대한 리스닝을 하고 있는지 확인하기 위해 Log 찍기
            number++
            numberTextView.text = number.toString() // 숫자를 문자열로
            Log.d("onClick", "+된 숫자는 $number") // 만약 에러용이면 Log.e
        }
    }

}
main_activity.xml
<?xml version="1.0" encoding="utf-8"?>
<LinearLayout xmlns:android="http://schemas.android.com/apk/res/android"
xmlns:app="http://schemas.android.com/apk/res-auto"
xmlns:tools="http://schemas.android.com/tools"
android:layout_width="match_parent"
android:layout_height="match_parent"
android:orientation="vertical"
tools:context=".MainActivity">
<TextView
android:id="@+id/numberTextView"
android:layout_width="match_parent"
android:layout_height="300dp"
android:text="0"
android:textSize="100dp"
android:textColor="@color/blue"
android:textStyle="bold|italic"
android:gravity="center"/>
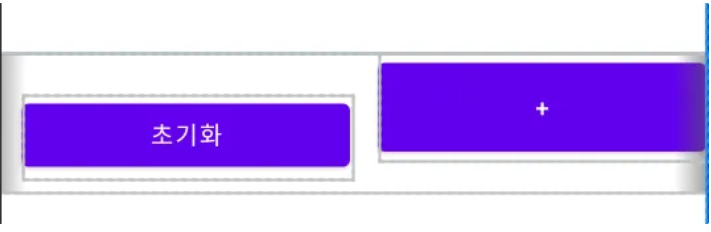
<!-- Linear Layout 는 vertical 이다.
그러나 버튼은 가로 정렬하고 싶다.
이럴 때는, 중첩 레이아웃을 사용하면 된다. -->
<LinearLayout
android:layout_width="match_parent"
android:layout_height="wrap_content"
android:orientation="horizontal">
<Button
android:id="@+id/resetButton"
android:layout_width="0dp"
android:layout_height="wrap_content"
android:text="초기화"
android:layout_weight="1"
android:layout_marginTop="16dp"
android:layout_marginBottom="16dp"
android:layout_marginStart="16dp"
/>
<Button
android:id="@+id/plusButton"
android:layout_width="0dp"
android:layout_height="wrap_content"
android:text="+"
android:layout_weight="1"
android:layout_margin="16dp"
/>
</LinearLayout>
</LinearLayout>
// UI 요소 가져오기
        val numberTextView = findViewById<TextView>(R.id.numberTextView)
        val resetButton = findViewById<Button>(R.id.resetButton)
        val plusButton = findViewById<Button>(R.id.plusButton)
2-3) 동작에 대한 연산처리 확인하기 ( Log.d )
        // 동작에 대한 연산 처리
        // 클릭에 대한 처리
        resetButton.setOnClickListener{
            // 리셋 버튼의 클릭에 대한 리스닝을 하고 있는지 확인하기 위해 Log 찍기
            Log.d("onClick", "리셋 버튼이 클릭되었습니다.") // 디버깅용이므로 Log.d
        }

        plusButton.setOnClickListener{
            // 리셋 버튼의 클릭에 대한 리스닝을 하고 있는지 확인하기 위해 Log 찍기
            Log.d("onClick", "+ 버튼이 클릭되었습니다.") // 만약 에러용이면 Log.e
        }
여러 가지 디버깅 수준으로 Log 를 찍을 수 있는데
그 중 Log.d 는 디버깅용이고
그 중 Log.e 는 에러용이다. ( 빨간글씨 )
Log 는 Android Studio 의
Logcat 에서 확인할 수 있다.
2-4) 전체 코드
MainActivity.kt
package com.part1.chapter2

import androidx.appcompat.app.AppCompatActivity
import android.os.Bundle
import android.util.Log
import android.widget.Button
import android.widget.TextView

class MainActivity : AppCompatActivity() {
    override fun onCreate(savedInstanceState: Bundle?) {
        super.onCreate(savedInstanceState)
        setContentView(R.layout.activity_main)

        // UI 요소 가져오기
        val numberTextView = findViewById<TextView>(R.id.numberTextView)
        val resetButton = findViewById<Button>(R.id.resetButton)
        val plusButton = findViewById<Button>(R.id.plusButton)

        // 동작에 대한 연산 처리
        // 클릭에 대한 처리
        resetButton.setOnClickListener{
            // 리셋 버튼의 클릭에 대한 리스닝을 하고 있는지 확인하기 위해 Log 찍기
            Log.d("onClick", "리셋 버튼이 클릭되었습니다.") // 디버깅용이므로 Log.d
        }

        plusButton.setOnClickListener{
            // + 버튼의 클릭에 대한 리스닝을 하고 있는지 확인하기 위해 Log 찍기
            Log.d("onClick", "+ 버튼이 클릭되었습니다.") // 만약 에러용이면 Log.e
        }
    }

}
activity_main.xml
<?xml version="1.0" encoding="utf-8"?>
<LinearLayout xmlns:android="http://schemas.android.com/apk/res/android"
    xmlns:app="http://schemas.android.com/apk/res-auto"
    xmlns:tools="http://schemas.android.com/tools"
    android:layout_width="match_parent"
    android:layout_height="match_parent"
    android:orientation="vertical"
    tools:context=".MainActivity">

    <TextView
        android:id="@+id/numberTextView"
        android:layout_width="match_parent"
        android:layout_height="300dp"
        android:text="0"
        android:textSize="100dp"
        android:textColor="@color/blue"
        android:textStyle="bold|italic"
        android:gravity="center"/>

    <!-- Linear Layout 는 vertical 이다.
    그러나 버튼은 가로 정렬하고 싶다.
    이럴 때는, 중첩 레이아웃을 사용하면 된다. -->
    <LinearLayout
        android:layout_width="match_parent"
        android:layout_height="wrap_content"
        android:orientation="horizontal">
        <Button
            android:id="@+id/resetButton"
            android:layout_width="0dp"
            android:layout_height="wrap_content"
            android:text="초기화"
            android:layout_weight="1"
            android:layout_marginTop="16dp"
            android:layout_marginBottom="16dp"
            android:layout_marginStart="16dp"

            />

        <Button
            android:id="@+id/plusButton"
            android:layout_width="0dp"
            android:layout_height="wrap_content"
            android:text="+"
            android:layout_weight="1"
            android:layout_margin="16dp"
            />
    </LinearLayout>
</LinearLayout>